
Disclaimer: This post is for educational purposes only. All torrent files, sources, and content referenced here are from legal and authorized sources, including open-source software, Linux distributions, etc.Note: This post is specifically for setting up a seedbox server with port forwarding. If you're looking for an introduction to BitTorrent or desktop client setup, check out this post instead.# I. Overview
For this setup, you'll need a basic Linux system (1 vCPU and 1 GB of RAM should be sufficient for light workloads, although a higher configuration is recommended, preferably running Ubuntu or Debian server) with SSH access and enough storage for your torrents.
| Requirement | Minimum | Recommended |
|---|---|---|
| Operating system | Ubuntu or Debian server (64-bit) | Ubuntu or Debian server (64-bit) |
| CPU | 1 vCPU | >1 vCPU |
| Memory | 1 GB RAM | >2 GB RAM |
| Network | Stable internet connection | High-bandwidth internet connection |
| VPN | A VPN provider supported by Gluetun (See list)
| A VPN provider with port forwarding support (See list) |
The seedbox server will run qBittorrent using Docker Compose, while the Web UI is used for remote management.
# II. Preparing the server
Log in to the server over SSH. Switch to the root user, then update the package lists and upgrade the existing packages:
sudo -i
apt update
apt upgrade -y
# III. Install Docker
If you already have Docker and the Docker Compose plugin installed, you can skip this step. Otherwise, follow the steps below.
The Docker installation process can change over time. Please refer to Docker's official documentation for the latest instructions for this step. Once Docker has been successfully installed, return to this page and continue with the next step.
Install Docker Engine on Ubuntu
Install Docker Engine on Debian
# IV. Mounting external drives (Optional)
If you're running this setup on a local computer instead of a cloud instance and storing torrents on an external storage device, configure the drive to mount automatically when the system starts. If you're running the setup on a cloud instance or storing your torrents on the system's internal storage, you can skip this section.
First, identify the drive and its UUID:
lsblk -f
Create a mount point for the drive:
mkdir -p /mnt/external
Then edit the fstab
nano /etc/fstab
Add an entry by pasting the following line into fstab. Replace {YOUR-UUID} and ext4 with the values shown by lsblk -f:
UUID={YOUR-UUID} /mnt/external ext4 defaults,nofail,x-systemd.device-timeout=30s 0 2
The nofail option allows the system to continue booting if the external drive is disconnected or unavailable, while x-systemd.device-timeout=30s prevents it from waiting indefinitely for the drive to appear.
Save the file by pressing Ctrl+O, then press Enter to confirm. Press Ctrl+X to exit.
After saving the file, reload systemd and test the configuration:
systemctl daemon-reload
mount -a
If mount -a produces no output, that normally means the mount succeeded. Verify it with:
findmnt /mnt/external
# V. Create a project directory
Create a dedicated directory for the project:
mkdir -p /opt/qbittorrent
cd /opt/qbittorrent
Create directories for the persistent configuration and downloaded files:
mkdir -p /opt/qbittorrent/config
mkdir -p /opt/qbittorrent/downloads
# VI. Create docker-compose.yml
cd /opt/qbittorrent
nano docker-compose.yml
Copy and paste the following configuration into the docker-compose.yml file.
---
services:
  gluetun:
    image: qmcgaw/gluetun:latest
    container_name: gluetun
    cap_add:
      - NET_ADMIN
    devices:
      - /dev/net/tun:/dev/net/tun
    ports:
      - 8080:8080 #qbittorrent web ui
    environment:
      - TZ=${YOUR-TIME-ZONE-HERE}
      - VPN_SERVICE_PROVIDER=${YOUR-VPN-PROVIDER-HERE}
      - VPN_TYPE=wireguard
      - WIREGUARD_PRIVATE_KEY=${YOUR-PRIVATE-KEY-HERE}
      - SERVER_COUNTRIES=${YOUR-SERVER-COUNTRIES-HERE}
      - PORT_FORWARD_ONLY=on
      - VPN_PORT_FORWARDING=on
      - VPN_PORT_FORWARDING_UP_COMMAND=/bin/sh -c 'wget -O- --retry-connrefused --post-data "json={\"listen_port\":{{PORTS}}}" http://127.0.0.1:8080/api/v2/app/setPreferences 2>&1'
    healthcheck:
      test: ["CMD", "ping", "-c", "1", "cp.cloudflare.com"]
      interval: 30s
      timeout: 10s
      retries: 3

  qbittorrent:
    image: lscr.io/linuxserver/qbittorrent:latest
    container_name: qbittorrent
    network_mode: service:gluetun
    depends_on:
      gluetun:
        condition: service_healthy
    environment:
      - PUID=1000
      - PGID=1000
      - TZ=${YOUR-TIME-ZONE-HERE}
      - WEBUI_PORT=8080
    volumes:
      - /opt/qbittorrent/config:/config
      - /opt/qbittorrent/downloads:/downloads # If using an external drive, replace this with your mount path, e.g.: "/mnt/external/downloads:/downloads"
    restart: unless-stopped
There are a few variables in the docker-compose.yml file that you'll need to change based on your own setup before saving and closing the file.
| Variable | Value | Example |
|---|---|---|
TZ |
Your timezone (for Gluetun). See the list of supported timezones for the correct format. |
TZ=Europe/Amsterdam |
VPN_SERVICE_PROVIDER |
Your VPN provider. Select one from the list of providers supported by Gluetun that offer port forwarding. |
VPN_SERVICE_PROVIDER=protonvpn |
WIREGUARD_PRIVATE_KEY |
Your WireGuard private key. The private key can be obtained from your selected VPN provider. | WIREGUARD_PRIVATE_KEY=xxxxxxxxxxxxx |
SERVER_COUNTRIES |
VPN server country. Select from the list based on your selected VPN provider. |
SERVER_COUNTRIES=Netherlands |
TZ |
Your timezone (for qBittorrent). See the list of supported timezones for the correct format. |
TZ=Europe/Amsterdam |
After changing all five variables to your custom settings, press Ctrl+O to save, press Enter to confirm the filename, and press Ctrl+X to exit.
# VII. Bring up the seedbox
Start the Docker Compose stack:
docker compose up -d
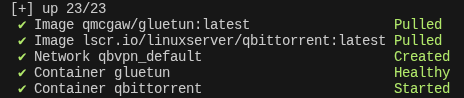
To update the Docker Compose stack in the future, use:
docker compose pull

and docker compose up -d

At this point, everything should be up and running. To make sure the Docker Compose stack starts automatically whenever your system restarts, we'll create a systemd service.
# VIII. Create system service
Create a systemd service for the Docker Compose stack:
nano /etc/systemd/system/seedbox.service
Copy and paste the following configuration into the seedbox.service file.
[Unit]
Description=Seedbox
Requires=docker.service
After=docker.service

[Service]
Type=oneshot
WorkingDirectory=/opt/qbittorrent
ExecStart=/usr/bin/docker compose -f /opt/qbittorrent/docker-compose.yml up -d
ExecStop=/usr/bin/docker compose -f /opt/qbittorrent/docker-compose.yml down
RemainAfterExit=yes

[Install]
WantedBy=multi-user.target
Save and exit, then reload systemd:
systemctl daemon-reload
Enable the service at boot:
systemctl enable seedbox.service
Start it now:
systemctl start seedbox.service
Check its status:
systemctl status seedbox.service
Check docker status
docker ps
If the seedbox.service is active and both the Gluetun and qBittorrent containers are running, everything is set. Your seedbox will now automatically start after a system reboot.
# IX. Access qBittorrent Web UI
Once the seedbox is up and running, you can access the qBittorrent Web UI from your browser.
First, check the qBittorrent Docker logs for the temporary login credentials:
docker logs qbittorrent
Look for the lines containing the temporary Web UI username and password.
If your cloud provider and/or instance has a firewall enabled, make sure the required port is allowed through it. If you are using port 8080 as in this guide, allow TCP traffic on port 8080 in your firewall settings. If you have assigned a custom port in docker-compose.yml (e.g. - 8443:8080) based on your own configuration, allow that port instead. (This is the port used to access the qBittorrent WebUI for management, not the port used for torrent traffic or port forwarding. No additional port needs to be opened specifically for port forwarding to work with this setup.)
Then open the qBittorrent Web UI:
Open http://{SERVER_IP}:8080 in your browser.
Enter the credentials
After logging in, go to Tools - Options - WebUI.
Under the authentication settings, enable Bypass authentication for clients on localhost. If you also want to set a permanent password, enter your desired password in the Password field. Then click Save to save the changes. (If you don't set a permanent password, you'll need to check the temporary password each time the service is restarted.)
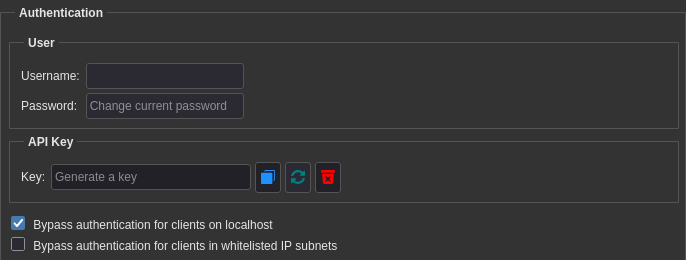
This allows the Gluetun service to communicate with qBittorrent locally without requiring authentication, which is necessary for Gluetun to automatically update qBittorrent's port-forwarding configuration.
If the forwarded port is still not updated after saving the changes, restart the Docker Compose stack to refresh the settings: docker compose down and docker compose up -d
# X. Verify Port Forwarding
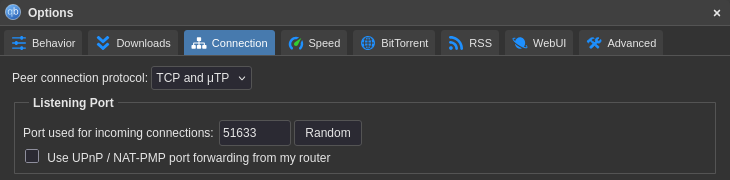
Now that qBittorrent and Gluetun are configured, you can check whether port forwarding is working correctly. (The entire port forwarding process is automatic for this setup, so no additional setup or port forwarding configuration is required on the router or elsewhere.) Open the qBittorrent Web UI and go to Tools - Options - Connection
Under Listening Port, check the port number.
For example, in this setup, the seedbox has port 51633 opened. You don't need to change any settings here; just take note of the port number.
Then go to Tools - Options - Behavior, enable Show external IP in status bar, and click Save.
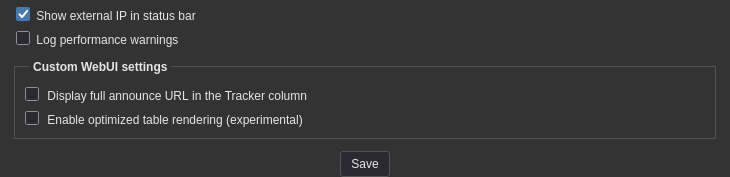
You should now see an External IP section at the bottom of the qBittorrent Web UI.

You can verify whether the port is accessible from the internet using an online TCP port checker, such as ping.pe
In this example, the External IP is 212.92.104.227 and the forwarded port is 51633.
We can check the port by visiting: https://tcp.ping.pe/212.92.104.227:51633 in a browser.
Simply replace the IP address and port with your own: https://tcp.ping.pe/{IP_ADDRESS}:{PORT}
If the checker reports that the port is open, your port forwarding is working correctly.
# Sources & Notes:
Docker / Docker Compose / qBittorrent / Gluetun
⚠️ Note: External resources are provided for informational purposes only. Use caution when visiting or interacting with third-party websites.